Overview
In this post we’ll go through how to develop and deploy additional view types beyond the default simple and detailed views in the document library in Share.
The techniques here require Alfresco 4.0.2 or later, or a recent checkout of community HEAD.
The Document Library Component
We won’t go into all the details on how the document library is rendered but it’s a fairly standard webscript-based component with ‘server-side’ resources like FreeMarker files for HTML fragments, Javascript for manipulating the data model, and localization properties files, and ‘client-side’ resources sent to the browser like CSS and Javascript.
While adding a document library view will involve changes to both client-side and server-side tiers, most of our notable changes will be to client-side Javascript files sent to the browser. The server-side webscripts changes are primarily to load and instantiate the client-side objects.
The component we’re interested in is at:
alfresco/site-webscripts/org/alfresco/components/documentlibrary/documentlist.*
and note that within that directory resources from include/documentlist.* are included by some of the primary files.
DocumentList and DocumentListViewRenderer
The DocumentList Javascript object makes up the bulk of the document library view and is defined in the client-side documentlist.js file along with event handler methods and other display setup. The DocumentList object sets up a YUI DataTable which handles most of the work of AJAX calls, pagination, etc.
Each column in the DataTable is assigned a method which dictates how to render that column given the data row. For example, the DataTable calls DocumentList.fnRenderCellThumbnail for the ‘thumbnail’ column of each row it renders.
The DocumentList also contains a set of registered DocumentListViewRenderers, ‘simple‘ and ‘detailed‘ by default, which do the work of generating the HTML for their view type. In other words, DocumentList.fnRenderCellThumbnail actually determines the current view renderer based on the current viewRendererName and hands off its work to DocumentListViewRenderer.renderCellThumbnail.
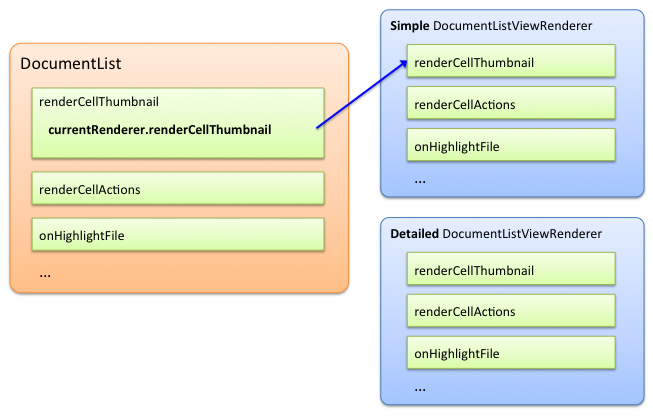
This allows developers to create their own objects which extend and override the DocumentListViewRenderer with methods for their specific needs.
For this example our goal will be to add a view which is very similar to the existing detail view but with larger thumbnails.
Steps to Add a View
Define the View
For a new view we need to define a new DocumentListViewRenderer object. That customization could be just a new instance of the base DocumentListViewRenderer with a different name so that alternate CSS is applied and metadata rendered.
The name of the view renderer specified in the constructor is used for CSS class names among other things so a simple example of adding a second detailed view with a larger thumbnail might look like:
new Alfresco.DocumentListViewRenderer("large");
In more complex scenarios you probably want to extend DocumentListViewRenderer in a client-side documentlist-custom.js file, which is what we’ll do in this example.
First we want to define a constructor:
Alfresco.DocumentListLargeViewRenderer = function(name)
{
   Alfresco.DocumentListLargeViewRenderer.superclass.constructor.call(this, name);
   // Defaults to large but we'll copy the metadata from detailed view
   this.metadataBannerViewName = "detailed";
   this.metadataLineViewName = "detailed";
   this.thumbnailColumnWidth = 200;
   return this;
};
then make it extend from DocumentListViewRenderer:
YAHOO.extend(Alfresco.DocumentListLargeViewRenderer, Alfresco.DocumentListViewRenderer);
and we’ll override the renderCellThumbnail method with almost the same code in the detail view, but adding a documents-large CSS class to the thumbnail container and changing the call to generateThumbnailUrl to use the imgpreview thumbnail definition:
Alfresco.DocumentList.generateThumbnailUrl(record, 'imgpreview')
(Full code)
Register the View
Once the view renderer has been defined it needs to be registered with the DocumentList object via its registerViewRenderer method. This needs to be done after the DocumentList object has been created and setup, so a good place to perform the registration is after the YUI Bubbling Event postSetupViewRenderers has fired. To register the same view above:
YAHOO.Bubbling.subscribe("postSetupViewRenderers", function(layer, args) {
   var scope = args[1].scope;
   var largeViewRenderer = new Alfresco.DocumentListLargeViewRenderer("large");
   scope.registerViewRenderer(largeViewRenderer);
});
Accessing the View
The user has to be able to navigate to this new view and even though we’ve registered it, the DocumentList needs to know which view renderers are enabled and in what order, both of which are defined in the DocumentList’s options under viewRendererNames. We can add our custom view above to the server-side FreeMarker model:
model.viewRendererNames.push("large");
Note that the name here must match the name of the view renderer constructor.
Not only does this define that the ‘large‘ view is enabled, the navigation buttons are also rendered from this viewRendererNames list, so we’ve taken care of the interface as well.
CSS
Our overridden renderCellThumbnail method above adds the documents-large CSS class so we’ll need to define that, as well as the display of the view selection button. Here’s a portion of the documentlist-custom.css file:
.doclist .thumbnail.documents-large {
	height: 200px !important;
	width: 200px !important;
}
.doclist .thumbnail.documents-large img {
    max-width: 280px;
}
Packaging
There are of course a number of ways this code could be packaged and deployed but this type of customization lends itself particularly well to a share extensibility module which Erik Winlöf and David Draper have blogged about in detail. We’ll assume a standard Maven or Gradle Java project layout for the code, and to keep things simple the example deploys as a Share jar rather than an AMP.
Server-side Resources
We need to define the customization itself:
src/main/resources/alfresco/site-data/extensions/custom-view-renderer.xml
<extension>
    <modules>

        <module>
            <id>Example :: Document List Custom View</id>
            <auto-deploy>true</auto-deploy>
            <customizations>
                <customization>
                    <targetPackageRoot>org.alfresco</targetPackageRoot>
                    <sourcePackageRoot>com.example.alfresco-share-doclib-views-example</sourcePackageRoot>
                </customization>
            </customizations>
        </module>

    </modules>
</extension>
We could place the javascript which creates the new view renderer a number of places, even purely client-side, but as we’ll see in another post it can be handy to have access to the FreeMarker data model so we’ll place it in:
src/main/resources/alfresco/site-webscripts/com/example/alfresco-share-doclib-views-example/components/documentlibrary/documentlist.get.html.ftl
Note that the the wrapping <@markup> directive there indicates that we want to inject the Javascript after documentListContainer.
We’ll place the server-side webscript javascript which enables the view at:
src/main/resources/alfresco/site-webscripts/com/example/alfresco-share-doclib-views-example/components/documentlibrary/documentlist.get.js
which will get its label from the localization file at:
src/main/resources/alfresco/site-webscripts/com/example/alfresco-share-doclib-views-example/components/documentlibrary/documentlist.get.properties
Client-side Resources
For including client-side CSS, Javascript, and image resources in a jar we’ll place them in the META-INF dir at:
src/main/resources/META-INF/alfresco-share-doclib-views-example/components/documentlibrary/*
So at this point src/main/resources should look like:

Package that as jar or AMP and deploy to your Share instance.
Results
The next time you go to a site’s document library you should see the additional
button for your view and the larger thumbnails:

Since we implemented this as a standard extensibility module you can completely disable it by going to your Share deployment’s module management page at something like http://localhost:8080/share/page/modules/deploy and disable the module.
What’s Next?
I’ll go into more advanced customizations in future posts, but in the meantime, what kind of doclib view are you going to build?
